Keeping your instrument clean and healthy is vital for a great sound and a long, happy playing life. With just a little thoughtfulness and quick and regular care, you can achieve many years of happy partnership with your instrument and protect your investment. Here are our 5 steps to violin, viola, cello and bass care (plus some great advice from our luthiers).
Step 1: Wipe down your violin. After each and every practice session, get into the habit of wiping down your entire instrument – including the strings. If the sweat and rosins build up on your instrument or strings, it can dampen your sound and affect the varnish. When it comes to strings, it will lessen their projection and lifespan. Using a soft, dry and clean microfibre cloth, gently wipe off any rosin dust or sweat from the fingerboard, strings, body, back and sides of your instrument. Don't forget the chinrest! You don’t need to apply too much pressure to the instrument body or strings.
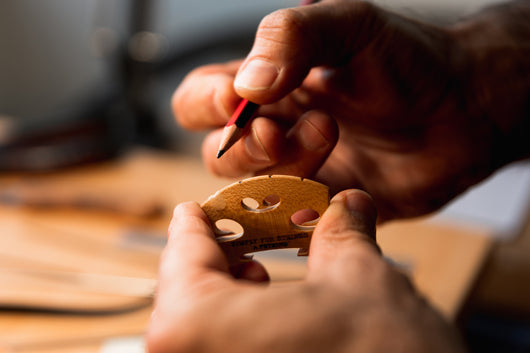
When cleaning the body of your instrument, take care around the F-holes and bridge. The woodwork of both the bridge and F-holes is very delicate, so take care to ensure the cleaning cloth doesn’t get caught in any nooks or crannies.
If you’re removing rosin or sweat build-up from your strings, you can use pure alcohol or a special string cleaner to remove this. Put a drop or two on a paper towel and gently wipe up and down the strings. Be careful to ensure the alcohol doesn’t touch any other part of the violin! Please only use this option in extreme circumstances: most luthiers and string makers agree that we should never put liquid of any sort on our strings because it can seep inside them and cause damage. Cleaning the strings properly with a dry cloth, under and over both sides, every time you play, will help preserve them better.
Step 2: Wipe down your bow. Like your instrument and strings, the rosin can build up on your bow and affect its sound and lifespan. Using a soft, dry and clean microfibre cloth, gently place the cloth between the bow hairs and stick and wipe the rosin off the stick. Get into the habit of doing this after every practice session. Periodically remove the bow screw, wipe the thread clean, and remove any dirt inside the frog area, adding a single drop of light grade oil, a thin swipe of vaseline or tiny spray of WD40 to the thread of the bow screw before reassembling.
Step 3: Keep your case clean. Empty and vacuum out your case once a week, or once you start seeing flakes of dust, dirt and rosin. Your instrument won’t stay clean if its storage isn’t clean, so keep an eye on your case too. This step has the added benefit of preventing dust mites. Those pesky mites love bow hair, so remember to cast an eye over the cleanliness of your case every couple of weeks.
Step 4: Deep clean and shine. If you have a lot of rosin and dirt build-up on your instrument, we recommend investing in some specialised string instrument cleaning solutions in order to take great care of your instrument and its varnish. These specialised string instrument cleaning solutions have been specifically formulated for the delicate varnish recipes used on violins. Never use a furniture or timber polish from a hardware store or similar – these could damage your varnish permanently and we definitely don’t want that!
We recommend using the Old Wood Italian Cream to remove dirt and rosin. Italian Cream is a cleaner and polisher, specifically designed for the most exclusive varnished string and/or wood instruments. It restores, protects and maintains the varnish, enhancing the wood's original shine and warmth. It does not contain silicone, abrasive ingredients, heavy oils or strong solvents.
If you’re diligently cleaning off rosin and dust from your instrument after every practice session, you might not need to use a varnish cleaner that frequently. Instead, you may want to treat your instrument to a shine, using a specialised polish like Viol. Viol can be used to give your instrument a beautiful shine before a performance, or just because! Make sure you fully buff off any polish or cleaner that you apply. It's only intended to clean and replenish, but never meant to remain and build up on the varnish!
You can also clean and service your pegs during a deep clean. We recommend using a very gentle, super fine steel wool to delicately remove any old peg paste or chalk build-up from the pegs. You can then follow this with a thin layer of new peg paste. You only need to apply the peg paste where the peg touches the peg box.
Step 5: Fine tuners. Periodically remove the fine tuners, one at a time. Clean the thread and apply two drops of light grade oil, a thin swipe of vaseline or small spray of WD40 to the thread of the bow screw before reassembling.
Finally, a general check-up. Just like a car, your instrument requires a general check-up every 8-12 months to ensure it's in peak playing condition. To ensure extraordinary practice and performance, your violin, viola, cello or bass requires regular servicing and maintenance from a professionally trained luthier. In a general service, a luthier will examine the bridge and soundpost of the instrument, and they can also perform a professional clean on your instrument. If your instrument hasn’t been in for a general check-up for a couple of years, book online today or get in touch with our team to discuss what we can do for you and your performance partner.
Some more tips from our team of luthiers and players…
Clean hands make clean instruments. Always wash your hands with soap before getting your instrument out of its case. Clean hands make clean strings and instruments.
Avoid alcohol. Be sure to use instrument-specific cleaning products. Using general spray and wipe products, alcohol wipes or water can damage your instrument inside and out.
Avoid sharing your instrument. During the course of a lesson, your teacher may borrow your instrument to demonstrate a technique or part of a new piece. This is why hand sanitiser is always handy to have around in the classroom or teaching room. We recommend wiping down the fingerboard and chinrest especially after sharing your instrument with another player.
Keep an eye on changing humidity levels. As the humidity drops, and the air becomes very dry, all of the timber in your instrument (aka, the entire instrument!) gets the moisture sucked out of it. As your instrument is handcrafted using different timbers, they all expand and contract in different ways, which can cause the pegs to slip or tighten or seams to open. You might even feel a sudden drop in the playing height of your strings or find that your instrument sounds dull. Your bow may react to the dry weather too. You might find the bow hair is too tight or too loose while humidity levels are low.
We understand your instrument's reaction to dry weather can be a hassle when you're just trying to practice, so we've got some tips to help your instrument survive humidity changes. (Check out our Instrument Care collection for all of these goodies and more!)
Invest in a humidifier. A humidifier will gradually release moisture into the surrounding air, helping to keep your instrument and bow happy.
Keep your instrument in its case when you're not playing. It's much easier to maintain an ideal humidity level (30% - 60%) if your instrument is in a small space.
Store your instrument in stable conditions. If you can avoid leaving your instrument near heaters or in drafty, cool rooms, your instrument will thank you!
Use a silk cover and/or a digital hydrometer. Silk is a natural fibre that helps regulate fluctuations in temperature and humidity. If you have dry lips, it's a good indication that the humidity levels are low. If you want to keep a close eye on the humidity levels, a digital hydrometer can stay inside your case at all times.
Follow these tips to keep your instrument as stable as possible, but do keep an eye on changing humidity levels throughout the year so you can ensure your instrument stays in tip top shape.
Make sure your bridge is always straight and upright (leaning a few millimetres towards the tailpiece is ok). With normal use and regular tuning, the bridge will gradually lean forward. If the bridge is left like this it will eventually warp and need replacement. To extend the life of your bridge, check it regularly and straighten it so the back of the bridge is perpendicular to the top (belly) of the violin. If you are not comfortable doing this yourself, as a teacher or your luthier to help you. General guide: if you mainly use the tuning pegs, the bridge can tend to develop a bend forward in the direction of the pegs. If you use the fine tuners most of the time, the bridge can gradually bend backwards. Checking regularly and adjusting the bridge to maintain its straightness is a very important step in your daily use of the instrument.
Strings should be checked regularly for signs of wear such as unravelling of the winding, corrosion, and unevenness. Strings gradually lose their tonal quality and need to be changed every 6-12 months for optimum sound and performance. Strings should be changed one at a time to avoid the bridge and sound post moving or falling over. Take care not to over tune your strings as they may break. Always wipe down your strings to remove hand sweat and rosin build-up, using a solution such as Boogie Juice may help with particularly thick build-up.
Take care not to over-tighten your bow. You should just be able to fit a pencil between the hair and the middle of the stick once you have tightened it and always make sure there is plenty of camber, or curve, in the bow stick. Avoid touching the hair of your bow. The oils from your skin will be absorbed by the hair which will make it harder for rosin to adhere and result in a loss of tonal quality and will shorten the life of your hair. Bows need re-hairing every 6 to 12 months (depending on use and seasonal changes). Hair stretches and becomes brittle with use. Hair will shorten in dry conditions and length in humid conditions. Do not subject your bow to any undue stress i.e. dropping, hold it by the tip, tapping it on your music stand or push the tip into the floor or your shoe.
Rosin your bow with long strokes back and forward across the entire length of the hair. If you will be able to tell there isn’t enough rosin on the bow if the hair will not grip the strings and the sound will be patchy and uneven. If there is too much rosin on the bow hair, excess powder will coat your instrument and the tone will become scratchy and dull. As a general rule, if you can see white powder on the instrument then there is too much rosin on the bow. Bows generally only need rosining about once a week and should only be rosined when the player feels a lack of grip in the strings. Good quality rosin should be as pure as possible and will help in producing a clear sound.
We hope you find these cleaning tips helpful. If you need some more cleaning tips, or some personalised advice, the Simply for Strings team is always here any time to help you maintain your instrument.


